If you want to use BoincTasks on the same computer as BOINC is running.
Just start BoincTasks and start working.
The localhost should be added automatically, if it doesn’t:
Select the computer tab (Show->computers), Choose from the menu, Computers -> Add computer and type localhost in the column IP address. In the column Computers, type in the name of the computer.
NEVER use the ip address of the local machine, but always use localhost.
Leave the password field empty on your localhost, but you may put in the local password if you want, otherwise it is read from the password file.
Add your remote computers automatically
If your remote computers are Windows machines, they can be added automatically, without any hassle: Add computers the easy way.
Add your remote computers manually
If you want to use BoincTasks, with several remote computers, follow the same steps as above.
Select the computer tab (Show->computers), Choose from the menu, Computers -> Add computer and add as many computers as you need.
Fill in the IP addresses of these computers and give every computer an unique name, in the column Computer.
If they are not there already, make the files remote_hosts.cfg and gui_rpc_auth.cfg on each remote computer.
These files are located in the BOINC data directory. How to find them? Look in the messages tab of BOINC Manager (at the start) for the line: Data directory: C:\ProgramData\BOINC
remote_hosts.cfg should have the line 192.168.10.1 or the IP address of the computer that runs BoincTasks.
There are two options when using passwords.
1) Copy the password in gui_rpc_auth.cfg and place it in the password field of BoincTasks.
2) Make you own password and place it in the password field of BoincTasks. Put the same password in the file gui_rpc_auth.cfg.
192.168.10.x are just examples, your computer may have an entirely different IP address. Never use the IP address 127.xx.xx.xx
BoincTasks uses port Pi 31416 to communicate with all (remote) computers.
Leave the port column empty in the computers window, unless you know exactly what your are doing.
For troubleshooting, read the FAQ section in the Forum.
If you have any problems, put in a request there and your answer will be there shortly.
BoincTasks opening and closing
 BoincTasks will hide itself in the taskbar. Clicking on the BoincTasks Icon will open the program. A user assigned “hot” key will do the same thing.
When BoincTasks is not in use, hide it by pressing on the [X] in the right upper corner. This way BoincTasks uses up almost none of your computer time.
Closing BoincTasks, by pressing the right mouse button over the BoincTasks icon and selecting “Exit”.
Adding computers
Select Show->Computers, or use the tab ![]() to show the computers window.
to show the computers window.
Choose from the menu, Computers -> Add computer.

The first column “Computers” holds the unique computer name.
The IP address is the name, the computer is locally known. Localhost is your local computer and an IP is the safest way to go for any remote computer. But names may be resolved as well.
For the local computer you may leave the password empty.
When you are done, click on the tasks tab. ![]()
Got more computers, the find computers dialog can help a lot. Select the computer tab (Show->computers), Menu Computer->Find computers.
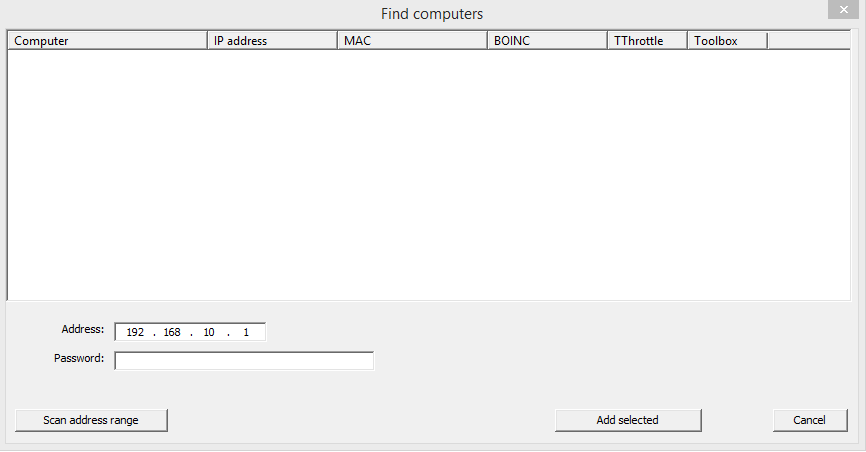
Press “Scan address range”, the net is scanned for computers, this can take some time.
On some computers, names can be used instead of IP addresses, but it tends to be less reliable. Sometimes they are found, sometimes they are not.
Ip addresses and MAC addresses are added when BOINC, TThrottle or BOINC Toolbox are found on the other side.
Finding BOINC Toolbox, TThrottle and not BOINC (missing yes), indicates a missing config file or a missing entry in the file.
If you are running the BOINC Toolbox, it may take up to 10 seconds for the BOINC client to restart and any changes to take effect.

Check the computers you want to add and press Add selected.
A password will be added automatically when you use the BOINC Toolbox. If not, don’t forget to add a password when you’re ready.
Dynamic IP addresses
BoincTasks can handle dynamic IP addresses by providing a MAC address.
A dynamic IP address is an address that can be different every time you startup the computer.
With a dynamic IP address, the network adapter properties are set to “Obtain an IP address automatically”.
The best way to add a mac address is to use “Find computers”.
This works even for existing computers, in that case only the missing MAC address is added.
If a MAC address is found in the computers tab it is used, regardless if there is an IP address.
Using a static address, you can remove the MAC address (empty it), this will help BoincTasks to connect slightly quicker.
A more detailed description can be found here.
Starting
After adding the computer(s), select at least one computer. (checkbox left of the computer name) and select the tasks tab ![]() .
.
This will reconnect all selected computers, the connection status can be seen in the computer tab. ![]()
Switching between pages
![]() Switch to the computers page.
Switch to the computers page.
![]() Switch to the project page.
Switch to the project page.
![]() Switch to the tasks page. This is the default at startup.
Switch to the tasks page. This is the default at startup.
![]() Switch to the transfers page. This shows the uploads and downloads.
Switch to the transfers page. This shows the uploads and downloads.
![]() Switch to the messages page.
Switch to the messages page.
![]() Switch to the history page.
Switch to the history page.
![]() Display graphic dialog.
Display graphic dialog.
Projects page ![]()
Pressing on the right mouse button, over a project, will display the project menu.
Tasks page ![]()
Pressing on the right mouse button, over a task, will display the task menu.
When there are a lot of WU in ready to start, enabling the filter will reduce the number of WU that are displayed.
All WU are combined by application. The deadline is that of the WU with the earliest deadline.

You can quickly remove a filter, on one of the computers, by double clicking on the filtered group.
Holding down the Ctrl key, will release all filtered groups, of the same status, on the computer.

A efficiency column, gives you info how your GPU task is doing or has completed.
The first number is the wall clock time an application has ran. The second the actual CPU time it took and the percentage is the CPU efficiency. The lower the % the less CPU it took to keep the GPU working.

Set warnings
You can set warning on the CPU %, to warn you, when a task is not running as usual. E.g. taking up more, or less CPU time than expected.

In this example, the first warning rule is a CPU only task. A warning color is shown, when the CPU % is between 0 and 50.
The second warning rule is a typical GPU task, running on the GPU and uses the CPU as feeder. So the CPU % is typically quite low. A warning is shown, when the CPU % is above 50%, meaning the CPU is being used, way too much.
Typically the GPU tasks, has gone into CPU fallback mode, by a GPU error.
The CPU and GPU values, of the first 4, can be found in the Use column. The last two values are the CPU % column values.
Sorting Tips
^ and V are the main sorting indicators, they are sorted last.
Press the Right Ctrl or Left Shift key first and hold it down while clicking on the top of the row, the V3 indicator appears.
This is the tertiary sorting row. This row is sorted first.
Press the Left Ctrl key first and hold it down while clicking on the top of the row, the V2 indicator appears.
This is the secondary sorting row. This row is sorted second.
Messages ![]()
When you have more than one computer, use the computer sidebar to select the right computer. Alternatively, press on the right mouse button and select a computer.
History ![]()
Displays all tasks that are in upload, waiting to report or reported. The tasks are deleted, after a user definable time period.
To check what has happened the last day.
Make use you enabled the history feature in the settings menu.
Graphics ![]()
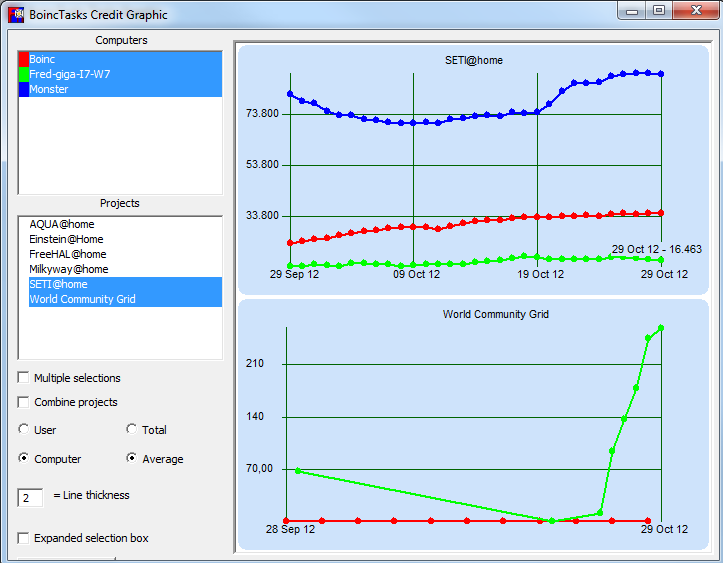
Credit graphics can be displayed, selecting multiple computers and multiple projects.
Tasks graphics ![]()
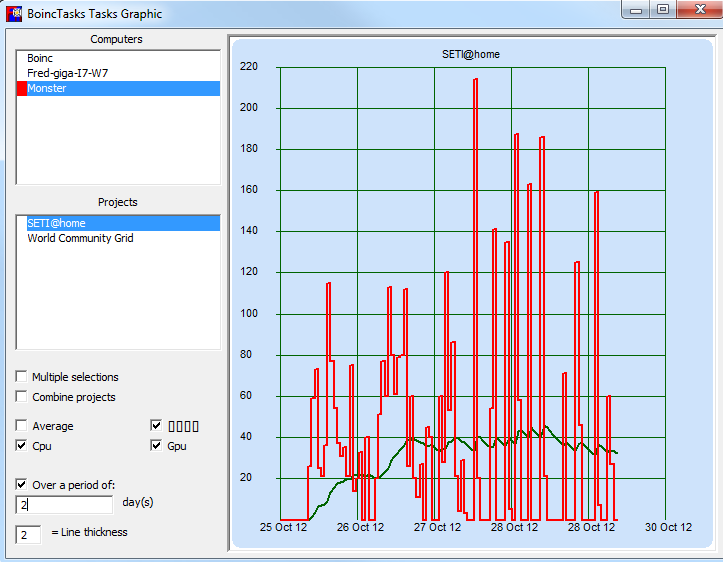
Tasks graphic shows the number of tasks, that where downloaded and when.
The settings dialog

Click here for the settings dialog manual
Connecting
Connecting to any computer is done automatically at startup. While connecting, the ![]() is shown in the computer sidebar.
is shown in the computer sidebar.
When a connection is established the icon disappears.
A lost connection is shown as ![]()
A more detailed status is shown in the computers tab ![]() .
.
If you want to try connecting again, on an unconnected computer, click on “all computers” in the computer sidebar, or select a single computer, in the computer sidebar.
Alternatively, it is possible to setup an automatic reconnect, in the settings dialog->expert tab. Fill in 120 seconds, next to the “= Reconnect every xx seconds.” text.
This will initiate a reconnect every 2 minutes, if needed. With a lot of remote computers, you may disable this feature by filling in a 0, or by putting in a higher delay.
TThrottle
To integrate TThrottle follow the next steps.
- In the menu, open Extra->Settings. In the general tab, check Connect to TThrottle
- In the same dialog, in the Tasks tab, at the end there are 2 Columns set to hide. Change these into throttle and temperature. To apply these changes press Apply.
- In TThrottle open the dialog and go to the tab preference and check Enable BoincTasks
- As of TThrottle 5.00 and BoincTasks 1.19 it is possible to set a TThrottle/BoincTasks password. The passwords in both programs must be empty (not secure) or identical.
WU regulator
As of 1.43, this function can now be found in: C:\Program Files\eFMer\BoincTasks\examples config.xml.
Instead of having a work buffer for a number of days, BoincTasks has the option for a work buffer of xx Work Units.
Even as BoincTasks doesn’t have much problems with larger amounts of WU, the BOINC client can get into problems with WU above 3000, but this depends on the system.
In the computer screen type in the WU you want in “Wanted WU“. Optionally type in a maximum daily work buffer in the “Days Work” field.
The last one limits an eventual overshoot. Expect an overshoot of 10%, depending on how fast BOINC reacts.
After changing the values in the “Wanted WU” field, best to close all BoincTasks windows and open them again. Or to exit BoincTasks and restart.
To be clear, the WU regulator doesn’t let you get any more work, than you otherwise would get using e.g. Boinc Manager.
And with some projects you may never reach the “Wanted WU” number.
The “Wanted WU” works as a ceiling so you don’t get too many WU, more than your computer can handle.
Tips
In the task view, you can select multiple tasks, by holding down the Control key. These selections, automatically follow the task name. So this is also a good way, to follow a task all the way to completion.
You can sort on 3 columns at the same time by clicking on the top of a column (last sorting). Holding down the left or right Control key selects the first and second sorting v2 & v3.
The Message view, keeps focused on the last line. To change this, select a line above it and the focus shifts.
Removing any selection, by using the control + click will resume following the last message.